There are two options for adding images to your blog post.
Add Image using Built-In img Main Image Option
Adding your blog images in this manner will place the image in the upper left corner of Blog page and allow text to wrap on the right.
The image chosen for img Main Image will be the image that gets shared on Facebook (when you choose to Share on Facebook when publishing the post).
- login to FASO account Control Panel
- click Blog icon (upper row)
![]()
- click Click Here to Add a New Blog Post
OR
click on Private Drafts
click Edit to the right of the title of your post - add image by selecting image for img Main Image option
*click on black down-facing arrow beside [No Picture] to choose by title
*click on the blue link that says, Choose an Image - to choose image visually - Save Changes
Add Images to Text Area
See this FAQ for more info: Add Image to Text Editing Screen
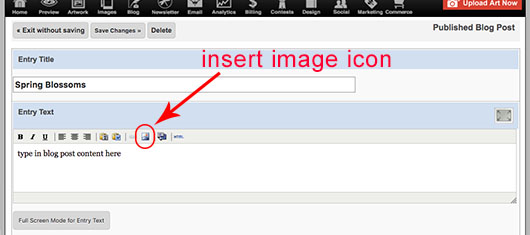
The Insert Image icon, above the text editing box, allows you to add images within the body of the text and adjust their size and placement.
- place your cursor in the text editing screen where you wish to place the image
- click the Insert Image icon (looks like mountains & sun)
A window will pop up with three ways to add an image:
Add a New Image from Your Computer
Use an Image that you've already uploaded
Use an Image from the another Website
- click on your preference
- locate your image from the list
- click on the thumbnail to select it
- click 'Insert Medium Image', 'Insert Large Image' OR 'Insert Original Image'
- repeat to add additional images
- click Save Changes
'Insert Medium Image': the image will show as a medium sized-image
300 pixels in largest dimension.
'Insert Large Image': the image will show as a large sized-image
550 pixels in largest dimension.
'Insert Original Image': the image will show as large as the original image you uploaded.
NOTE: it is best not to add images side by side due to how images are displayed on small mobile devices.
Change Image Size and/or Location (when using the insert image icon):
To center the image, click on it, then click the Align Center icon.
To resize the image:
- click on Full Screen Mode (gray button at bottom left or small grey square upper right)
- click on the image to select it
- click on Edit Image Properties pop up box (small yellow box above image, top left of page)
- for Dimensions field add desired pixel dimension to ONLY one field.
The other dimension will automatically adjust. This will assure that picture is re-sized proportionately. - click Update or Insert (lower left)
You may need to scroll down to see the Insert link on the pop up screen - click Save and exit button (top right)
- click Save Changes
NOTE: Please do not make the 300 or 550 pixel images larger. They will not be sharp. If you want to show an image larger than 550 pixels, you will need to insert Original image and then size it down (in most cases).
NOTE: If your browser shows little white boxes all around the image, you can also simply drag one of the corner boxes to resize the image.
When using both methods to add images to the blog post, be sure to add enough text to wrap the top image before using the Insert Image icon to add additional images.
If you don't, the image (added into the text area of the screen) will distort the blog page.
Also see this FAQ: Setup and Publish Your Blog